 One
of the most unique and beautiful animals on earth is the horse.
There are many books on various breeds of horses, and I won’t
attempt to focus on them here. Instead, I will demonstrate good
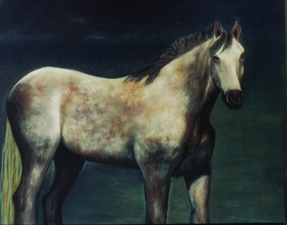
confirmation of the "Gray," a horse common in southwest
and western North America.
One
of the most unique and beautiful animals on earth is the horse.
There are many books on various breeds of horses, and I won’t
attempt to focus on them here. Instead, I will demonstrate good
confirmation of the "Gray," a horse common in southwest
and western North America.
There are 12 areas of the horse’s anatomy that deserve close attention: the head, neck, withers, shoulder, back, loin, rump, chest, hock, cannon bones, hoof and pastern.
Head: A horse’s head should look powerful, intelligent and strong. The face should be lean and fine, with the muzzle and nostrils well defined. Eyes should be clear and large, balanced and alert. Eyelids should curve uniformly, and the ears should be small, pointed and alert. Facial markings add to the horse’s identity. Also pay close attention to the shape of the horse’s mouth and nostrils – they reveal a great deal of the horse’s emotional state.
Neck: A well drawn neck adds an enormous sense of graceful power. Observe the major muscles in the neck. You should show a sturdy, strong, straight neck that is in correct proportion to the rest of the horse’s body. Avoid making the neck too thin or bowed.
Withers: The withers are a dominant ridge on the dorsal spine and form a junction between a horse’s neck and back. A horse’s withers are neither thin nor heavily muscled. Be accurate when drawing withers!
Shoulders: A healthy horse has long, sloping shoulders that enable it to better absorb the impact as its front legs strike the ground. The shoulders offer strong planes that can give your drawing or painting the look and feel of power.
Back: To have maximum strength, a horse’s back should be short. Longer-backed animals have a tendency to develop the characteristic aging dip know as “sway-back.”
Loin: This loin is located on either side of the backbone, between the last rib and the point of the hip. On horses with short, strong backs, this distance is about 2 inches, or three finger widths. The point of the hip is carefully defined, and helps give the illusion of form to the rump.
Rump: The rump is a significant mass with strong planes and a look of power. It should be of good length for strength and moderate in slope and width. At the lower part of the rump is the dock – the external base of the tail.
Chest: A good chest is of moderate breadth and not too deep. Don’t draw or paint the chest too round or too flat!
Hock: Roughly equivalent to a human elbow, the hock is the large joint found midway down a horse’s rear leg. Pay close attention to avoid the “cow-hocked” look where the hocks are turned in. This area should be defined with smooth, large, prominent bones.
Cannon Bones: Cannons are found in both the fore and hind legs, and run from the knee in the foreleg and the hock in the hind legs to the fetlock – the hair-tufted projection just above the hoof. Cannons should be short, flat, broad and strong. Avoid drawing or painting cannons that are calf-kneed, knock-kneed or bow-legged. Cannons should be uniformly wide from top to bottom.
Hooves: The hooves are possibly the most critical of all elements in the horse’s makeup. The feet shouldn’t be abnormally flat, toed-in or toed-out. The heels should be broad, but not excessively high.
Pastern: This is the strong, yet delicate-appearing area between the fetlock and the top of the hoof. It should be sloped, but not short and stubby.
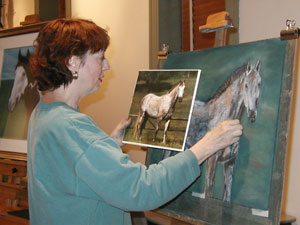 When
drawing with pastels, I either use Canson Mi-Teintes or Wallis
paper. For this demonstration I began with a dark green Mi-Teintes
paper. As you can see, I used a clear photograph of the Grey,
mounted on foamboard for easy handling. It’s good to have
more than one reference photo to compare the anatomy for accuracy.
When
drawing with pastels, I either use Canson Mi-Teintes or Wallis
paper. For this demonstration I began with a dark green Mi-Teintes
paper. As you can see, I used a clear photograph of the Grey,
mounted on foamboard for easy handling. It’s good to have
more than one reference photo to compare the anatomy for accuracy.
I have collected a variety of pastels, and usually begin with my Rembrandts, which are a bit harder than the other brands. I enjoy using Unison and Sennelier because of their soft richness. Instead of lugging around boxes or trays of pastels, I glued some empty pastel boxes onto a medium-size sheet of foamboard, and then sorted my pastels according to color and value. This makes it much easier to find certain colors, and keeps my pastels clean and in order. It’s also easy to take with me for a demonstration at an art association.
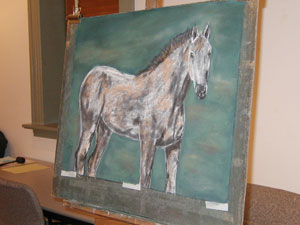
Because I like to keep my paper clean, and have the pastel dust fall straight down onto my easel, I always begin my drawing at the top. In this instance, I didn’t wish to duplicate the background of the photograph, so instead I added some dark blues and greens to my background to make the horse stand out more. Because this demonstration was done in under an hour, my drawing didn’t include the hooves of the horse. (Next time!)
Even though my demonstration horse is a “Grey”, it doesn’t mean the horse should be drawn with only grey pastels. Use a variety of complimentary colors to give warmth to your greys. As in oils, going into your dark colors first will make your lightest lights really pop when you add them. By adding your lightest light colors last, you further define the horse’s features.
When I wish to capture fine detail, I use pastel pencils. I have a nice assortment of pencils, and recommend using them when drawing the withers and tail.
 One
of the main problems I see in student’s drawings of horses
is the neck being too scrawny or bowed. A strong neck is important
to add strength and character to your horse. Show that muscle
beginning behind the ear and running all the way down the neck.
By using a dark value for the muscles, such as dark blue or
purple, you begin to “sculpt” the dimensions of
the horse.
One
of the main problems I see in student’s drawings of horses
is the neck being too scrawny or bowed. A strong neck is important
to add strength and character to your horse. Show that muscle
beginning behind the ear and running all the way down the neck.
By using a dark value for the muscles, such as dark blue or
purple, you begin to “sculpt” the dimensions of
the horse.
Step back at times to compare your photograph and drawing for accuracy. I extend my photograph at arm’s length, squint my right eye, and compare photo against drawing. This enables me to catch any anatomical mistakes which might stand out later. The beauty of pastel is having the ability to make changes whenever necessary. Water mediums don’t always allow us this luxury!
It’s important not to overwork your pastel. Take breaks away from your work, and then come back with a fresh eye. You want your piece to be appealing and beautiful to the viewer. I don’t like to “fix” my pastels with any fixative. I feel that fixatives only darken the drawing. Instead, I believe if you use quality pastel paper, and really shake off the pastel dust outside, you won’t need to use a fixative.
Lastly, be happy with your pastel drawing. This is your creation for you to share with the world!